Using Room Booking, user can book meeting spaces directly through a shared room device, eliminating the need to search for available rooms on a calendar. The booking can be done from a Touch 10 or Room Navigator, or by using Webex Assistant. The Room Navigator can be setup outside a room as a room booking device.
|
To enable Room Booking, make sure to follow these steps in the following order:
-
Configure Hybrid Calendar
-
Configure scheduling account
-
Configure devices with calendar in Control Hub
To enable Room Booking, you need to configure Hybrid Calendar for your organization. You can configure it for Microsoft Exchange, Microsoft 365, or Google Calendar.
See the Deployment Guide for Cisco Webex Hybrid Calendar Service on how to configure Hybrid Calendar.
|
If meeting schedulers aren’t enabled for the Hybrid Calendar Service, and the only invitees that are enabled for the service
are room resources, you must ensure that Exchange doesn’t have a policy to automatically delete meeting comments. Set Delete Comments to False
|
It’s necessary to configure a scheduling account to allow room devices to schedule meetings.
The scheduling account is used as the meeting organizer for all meetings booked from Webex Devices. This account books the room the same way as a user normally does. By booking meetings from the scheduling account and inviting a room, room policies in the calendaring system are respected. Ensure that you have entered a valid email address that has permissions to book the rooms for which you will enable Room Booking.
Since this account is used to book meetings for all the rooms for a given Exchange configuration, it’s important to make sure that its mailbox is regularly cleaned up. The clean-up is necessary to avoid exceeding Exchange limits. If your Exchange is already set up with a suitable retention policy, make sure it applies to this account. If not, you must configure the mailbox so that all default folders (emails, sent items, and meetings) are automatically deleted after a number of days. The clean-up ensurers that the account can keep scheduling meetings on behalf of the room devices.
Check the following resources for Exchange:
| 1 |
Log in to the Expressway web interface. |
| 2 |
Go to . |
| 3 |
Under Scheduling, enter a valid scheduling account email address that is used book your meeting rooms. 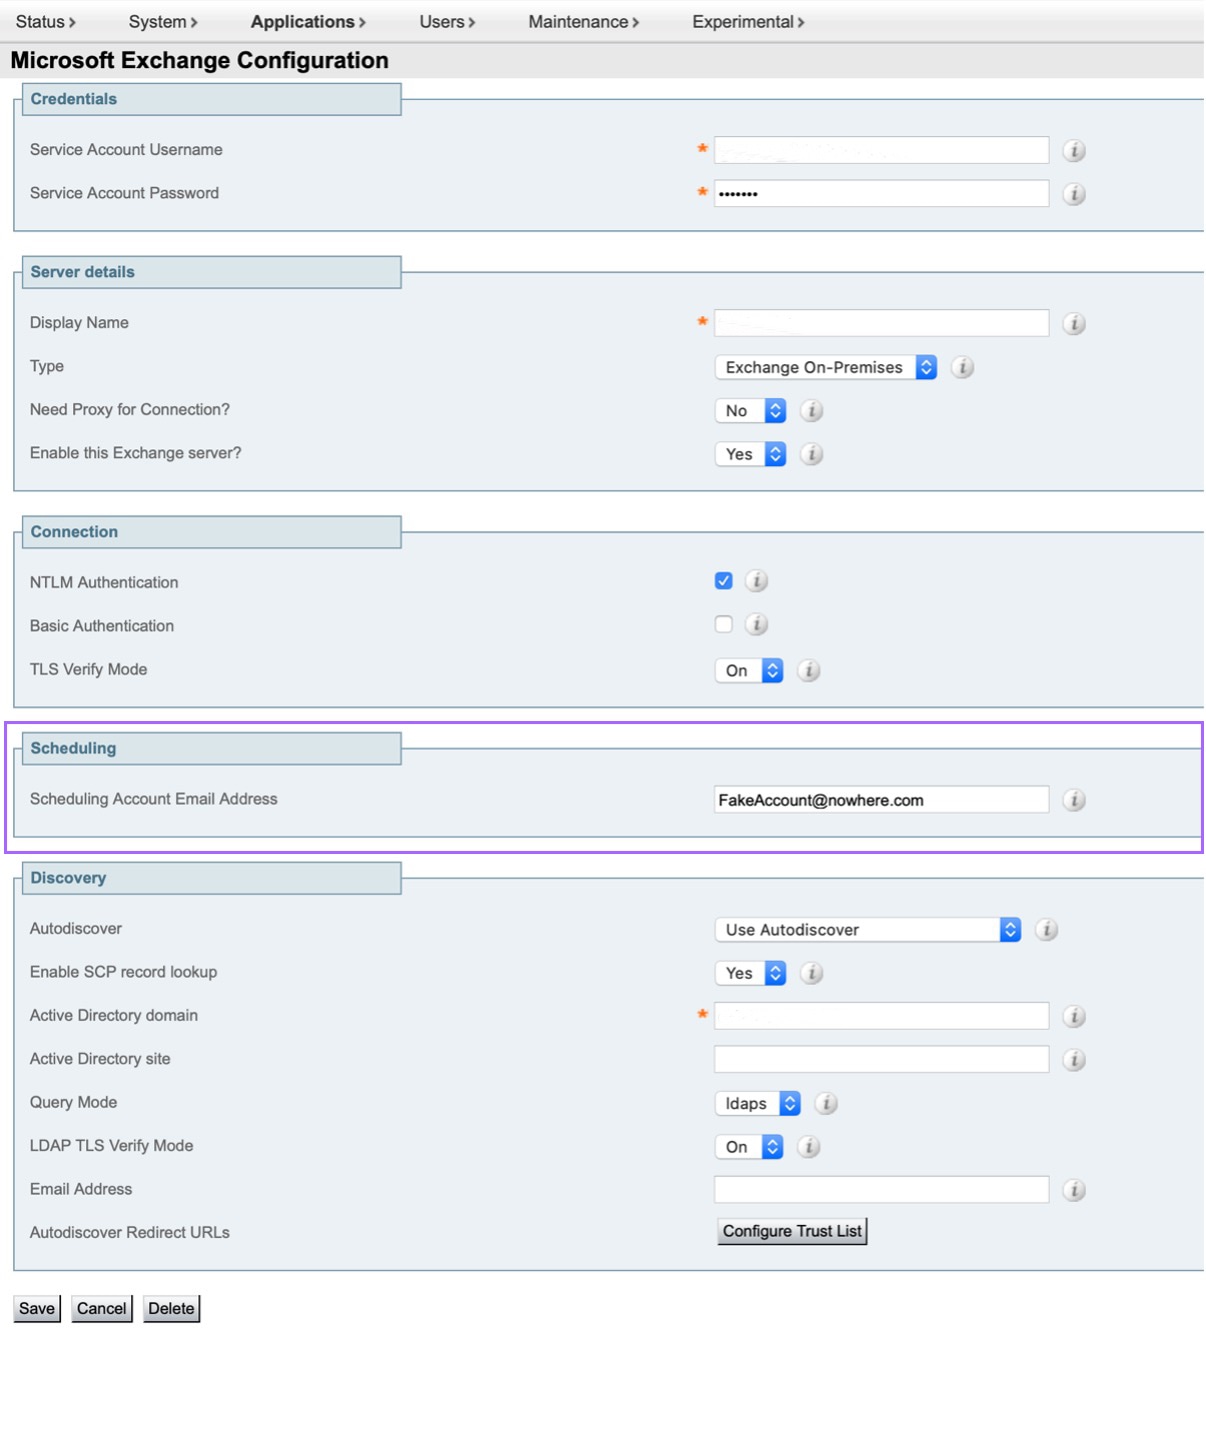 |
It’s necessary to configure scheduling account to allow room devices to schedule meetings.
The scheduling account is used as the meeting organizer for all meetings booked from Webex Devices. This account books the room the same way as a user normally does. By booking meetings from the scheduling account and inviting a room, room policies in the calendaring system are respected. Ensure that you have entered a valid email address that has permissions to book the rooms for which you will enable Room Booking.
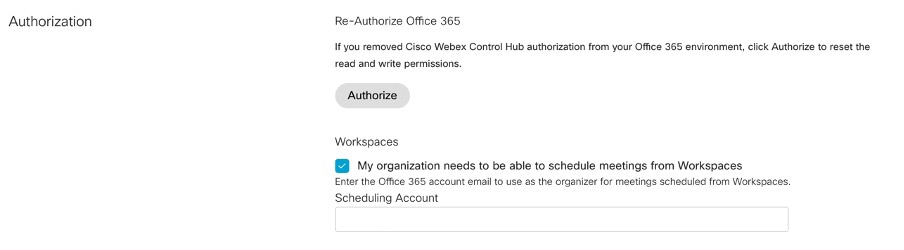
Configure the scheduling account for Microsoft 365 from Control Hub. From the customer view in https://admin.webex.com, go to Hybrid. From the Hybrid Calendar card for Microsoft 365, click Edit settings.
Check the check box to allow workspaces to schedule meetings. Enter a valid email address for the scheduling account.
It’s necessary to configure scheduling account to allow room devices to schedule meetings.
The scheduling account is used as the meeting organizer for all meetings booked from Webex Devices. This account books the room the same way as a user normally does. By booking meetings from the scheduling account and inviting a room, room policies in the calendaring system are respected. Ensure that you have entered a valid email address that has permissions to book the rooms for which you will enable Room Booking.
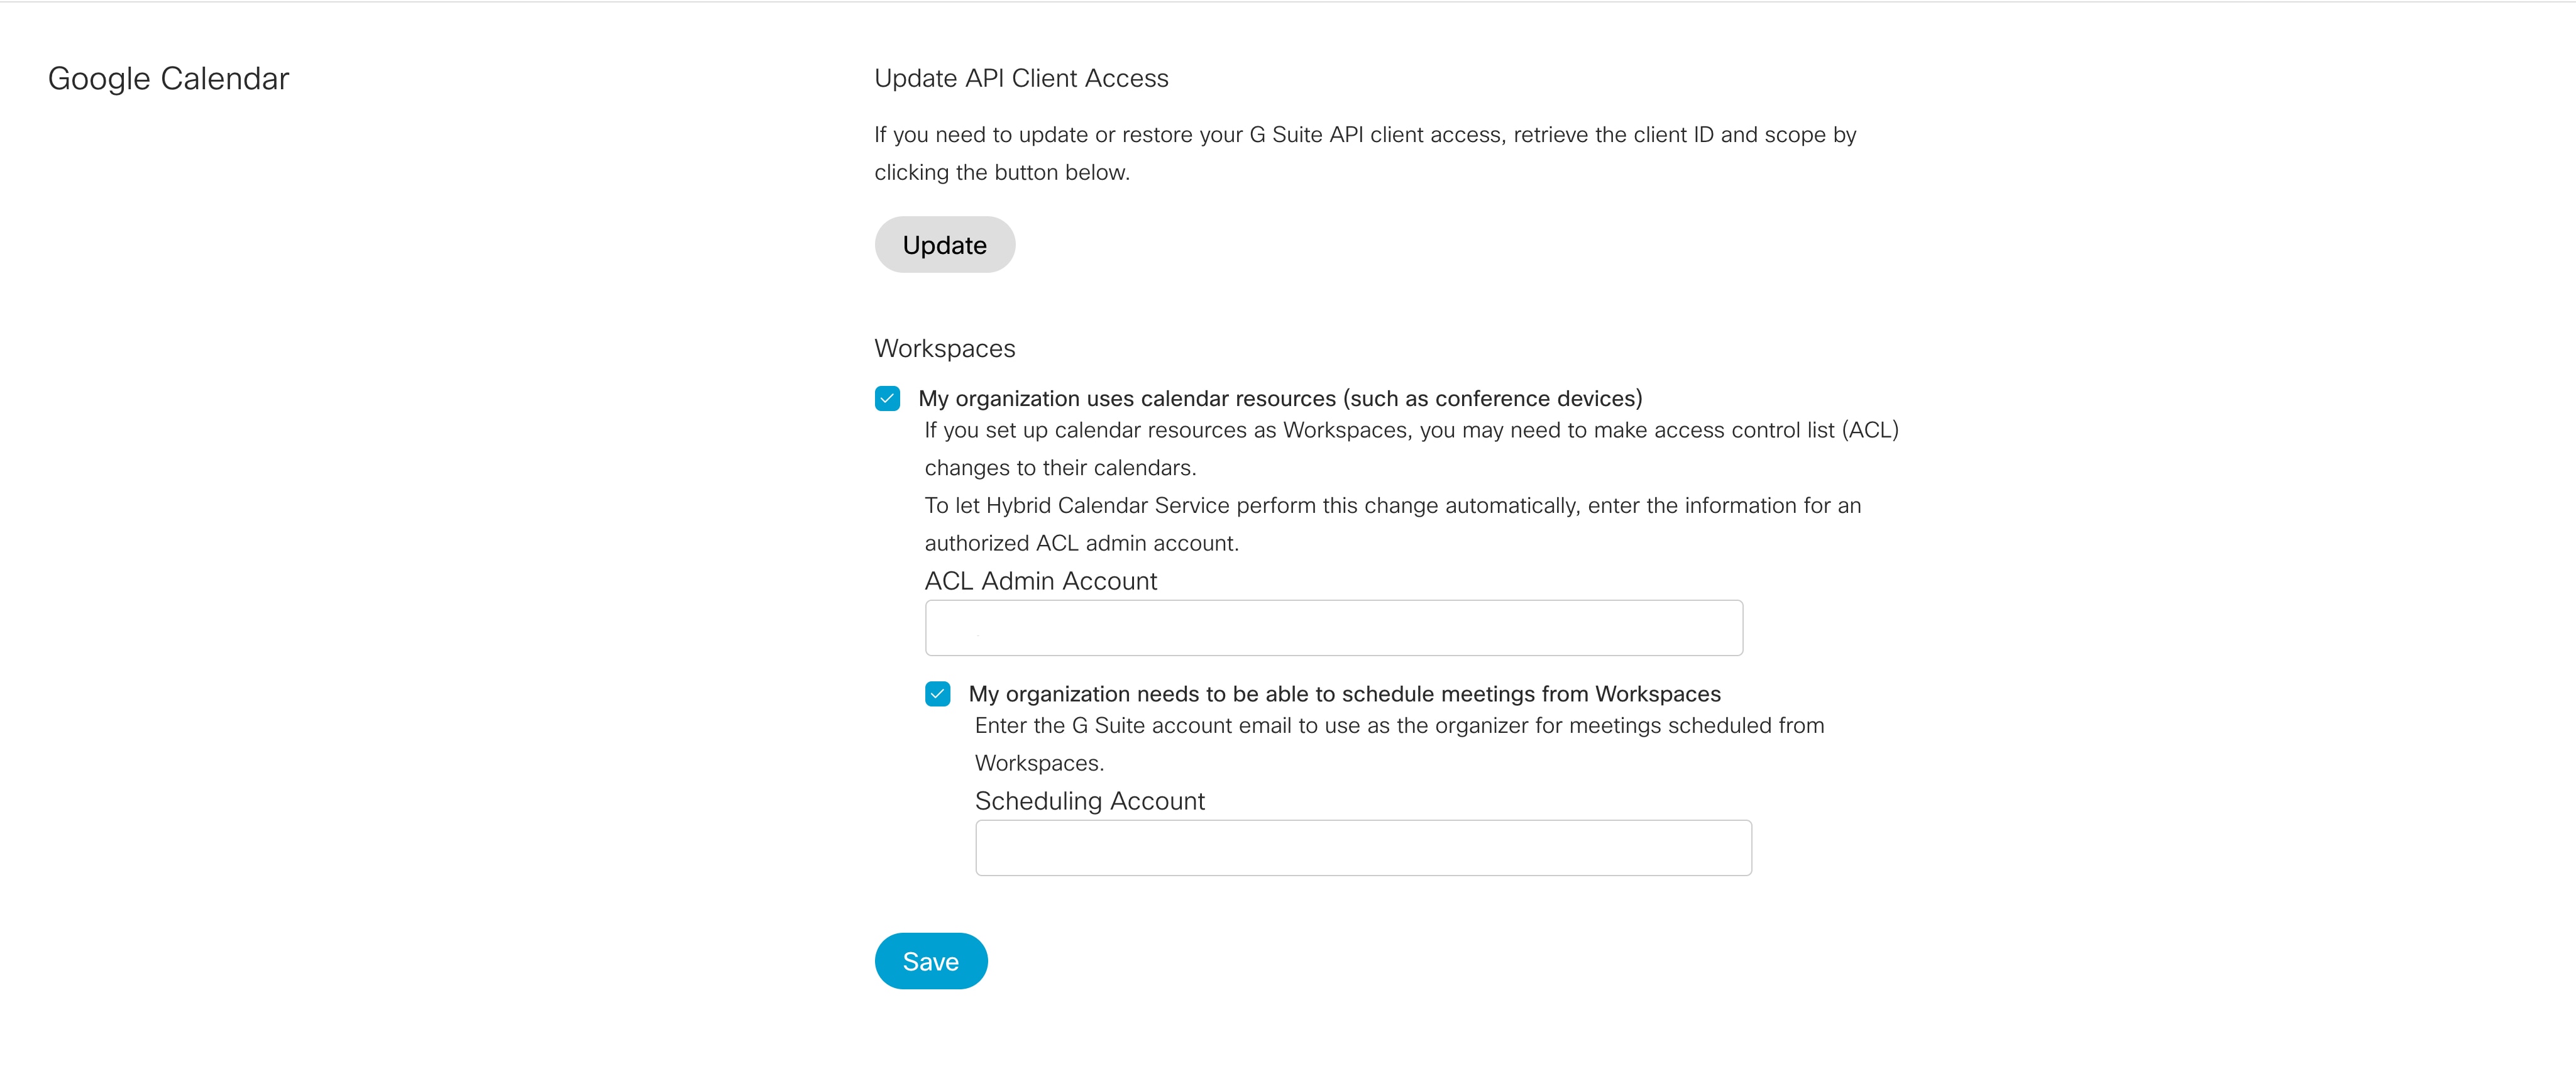
Configure the scheduling account for Google Calendar from Control Hub. From the customer view in https://admin.webex.com, go to Hybrid. From the Hybrid Calendar card for Google, click Edit settings.
Check the check boxes to allow your organization to use calendar resources and to allow workspaces to schedule meetings. Make sure that you have configured an ACL account and enter the email for that account.
Before you enable Room Booking, you need to check that One Button to Push (OBTP) has been enabled for those devices. If you want the people in your organization to use voice commands for room booking and other device controls, enable Webex Assistant.
Check that the calendar is enabled for the workspaces for which you are enabling room booking.
| 1 |
From the customer view in admin.webex.com, go to Workspaces. Select the workspaces you want to configure from the workspaces list and click Edit. |
| 2 |
Under In-Room Booking, select On from the drop-down menu. Individual workspaces: If you want to enable room booking for one workspace, select the workspace and click the cogwheel in the Calendar section. Select Edit In-Room Booking Settings and toggle on in-room booking. |
A significant percentage of meetings result in ghost meetings, meaning no one shows up and the meeting resources are wasted during the booking. Enabling the check In option helps alleviate this problem. The users can check in to their booking when they arrive to the meeting room which confirms the booking. If no one arrives for the booking, the meeting room is released and others can book the free meeting room.
Check in and out is available on shared bookable devices and standalone Room Navigator.
When enabled, a check in button appears on the inside and outside-room touch panel. Check out button appears on the inside-room for paired touch panels. For a standalone Room Navigator, check out buttons also appears on the outside-room panel. If a joinable meeting has been booked (OBTP), the check in button is only visible outside the room.
Starting 5 minutes before a booking, a check in button appears on the outside-room and in-room touch panels.
A user has 10 minutes from the start time of a booking to check in. If no one checks in during the 10 minutes, manually or automatically, the room is automatically released. 30 seconds before the end of the check in window, a 30-second countdown automatic-room-release alert appears on the touch panel. The check in window is configurable.
When a room is checked in and a call ends, an alert pops up reminding the user to check out if they wish to. If the user cancels the countdown or ignores the alert, the room is checked out. If a user can extend a booking, the room device stays checked in for the time the booking is extended.
When a booking has reached the last 5 minutes of its scheduled time and there is a back to back meeting, a notification pops up informing the user that the booking will be ending soon.
Once the booking is released, a notification is sent to the host to inform them about the canceled booking.
Automatic check in
Automatic check in starts 4 minutes after the booking has started.
Room device will automatically check in for:
-
Ad hoc bookings
-
Joining a call
-
Share session started (wired to wireless)
-
People count is 1 or more (People count is considered 1 or more after 1 minute of continuous room in us.)
Manual check in
A user can manually select to check in by tapping the check in button.
Configure check in and check out
Enable to let user check in to the rooms they have booked to confirm that the room is in use. If the user doesn’t check in, manually or automatically, the room booking is released and the organizer gets an email informing about the cancellation.
Starting 5 minutes before a booking, a check in button appears on the outside-room and in-room touch panels and it stays there
for the duration set with Bookings CheckIn WindowDuration.
Bookings CheckIn Enabled: <True/False>Default: False
Check in window is the time the check in option is available on the touch panel. Check-in window duration can be specified to 5, 10, 15, 20, 30 or 60 minutes.
Bookings CheckIn WindowDuration: <5, 10, 15, 20, 30, 60>Default: 10
Configure whether the check out button is shown outside and inside the room, inside the room, or not at all.
Bookings AllowDecline: <All, InsideOnly, None>Default: All


